PHP Lint has got your back

Hopefully, you have one of those friends who has your back, who will step in and stop you from making a really, really stupid mistake. Because we all are fallible and whether it be in a moment of rage, or just because we are in a rush, we will make mistakes.

This is why I have PHP Lint added as a pre-commit hook on my PHP Project repos. It only takes a minute to set it up and will have you a ton of time, and headache in the future.

First, you need to make sure you have PHP Lint installed on your system. If you are a PHP developer, then the chances are you have it.

Next go to you PHP project .git directory and add the following code to the file .git/hooks/pre-commit


And that should be it. Now every time you do a commit on some PHP code, your git workflow will send each file through the PHP Linter to check for errors. See the example below

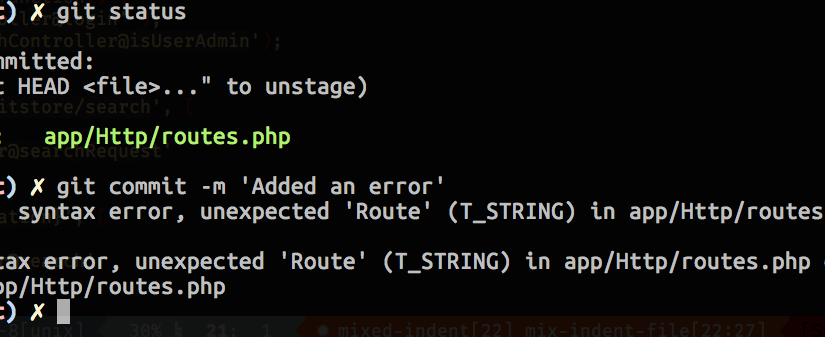
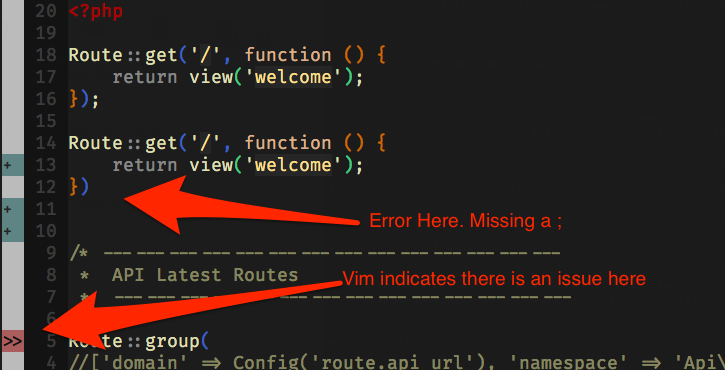
Most editors will show you when you make an error, but we are rushing and don't notice that we forgot to add a semi-colon.

routes_php____Documents_GitRepos_DiegoDev_iParq_core_app_Http__-_VIM

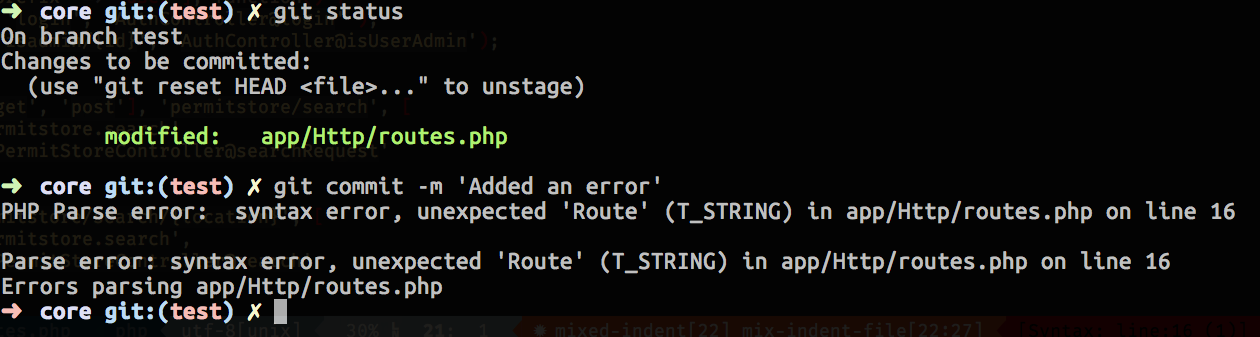
We add the file and attempt to do a commit but because of the hook, Git will refuse to commit the files, and we can sleep easier at night knowing we can't accidentally send broken code to our repo.

2__eric_DiegoDev____Documents_GitRepos_DiegoDev_iParq_core__zsh_

One thing to note, this git hook will only parse the files you are committing and not the entire project. Meaning if you have a co-working was not doing linting, and you pull in their changes but don't touch the file, your commit will not catch it.

Getting some functionality back in the system tray on Ubuntu 11.04

Ubuntu 11.04 introduced a new, cleaner user interface called Unity. I'm not a huge desktop GUI guy, doing a large majority of my work in the command line, but I do like to try and stay current on the latest greatest interfaces.

I'm not overwhelmed with Unity. It's OK but not really earth shattering. You have the option to switch back to the "classic" Gnome interface if you wanted to but I haven't done that.

One huge annoyance I've noticed about the new Unity interface was a lack of a true "system tray". Many application in Ubuntu (or Linux in general) leverage a similar approach Windows machine do and allow applications to run in a System Tray, cleaning up any task bars you might have. In Unity, there were a couple applications that were visible, like Dropbox, the clock and Volume but several others were not such as Skype and Truecrypt.

This became a big problem for Truecrypt because once I closed the Truecrypt interface I couldn't figure out how to get back to it. If I tried to launch the application again the system would report that it the application was already running, which it was. In the past I would get back to the interface through the icon in the system tray but this icon would not display in Unity, at least not until I found a posting on Facebook http://www.facebook.com/topic.php?uid=6723083591&topic=17003

This simple command in a terminal window corrected my problem and life is good again

  1. gsettings set com.canonical.Unity.Panel systray-whitelist "['all']"

As you can see I got all my system tray icons back and I am now a little happier with Unity.


Screenshot-1


Posted via email from shocm

Great Mac tar archive tip

Every now and then I just post things I don't want to forget or worried that the original website might disappear. This is one of the cases. This is a blog posting I came across on a little problem that plaques those of us that enjoy using OS X but have a need to move files to other systems like Linux and Windows.

There is a dirty little secret the Mac hides from you when you are using it but becomes a glaring eyesore when you move to another OS. Some file clean up needs to happen because OSX creates these hidden files that start with a ._ which contains some extended information about the file that no other system reads so they aren't terrible useful when moving files to these systems. This post from a person working for Splunk, outlines how to tar up files on a OSX machine that is targeted for other systems and exclude the ._ files from the tarring process. Original article can be found here

--------------- POST ----------------------

When building Splunk applications, I’m often working on a Mac. There
are files that begin with ._ that are resource files, which contain
extended attribute information about the files for the OS. This is
great and all but I don’t want to include these files when I package up
an application and upload it to SplunkBase.

If you don’t have deep OSX knowledge, then keeping these files out
of your tarball is harder than it looks. One of our OSX gurus pointed
me toward the answer, and I was so excited (yes, I am a geek) that I
just had to share.

To build a tarball in Leopard that doesn’t contain the ._ files, use:

COPYFILE_DISABLE=true tar cvzf filename.tar.gz dirtotar

In Tiger, use:

COPY_EXTENDED_ATTRIBUTES_DISABLE=true tar czvf filename.tar.gz dirtotar

This is definitely going in my .bashrc so I don’t have to fuss with it again:

export COPYFILE_DISABLE=true

--------------- PEND OF POST ----------------------

QuickTip – Firefox

If you spend any amount of time on the Internet and are anything like me, you usually have a set of sites you visit on a regular basis. Here is a quick time saving tip if you use Firefox. Organize all your commonly visited web sites into a single "Daily Setup" file. I actually have two, one personal that opens all my favorite web sites that I usually read at least once a day and another for work which opens a bunch of work related sites. Then all you need to do is click on your Daily Setup bookmark, select the setup you want (personal or work), and click on "Open All in Tabs" and BAM you are off and running with your daily injection of Internet feed.

FirefoxQuickTip

Hope you find this tip useful.

Backing Up and Restoring Your MySQL Database

Do you need to change your web host or switch your database server? This is probably the only time when you really think of backing up your MySQL data. If you've got a website with a database or your custom database running for your applications, it is imperative that you make regular backups of the database. In this article, I will outline two easy ways of backing up and restoring databases in MySQL.
The easiest way to backup your database would be to telnet to the your database server machine and use the mysqldump command to dump your whole database to a backup file. If you do not have telnet or shell access to your server, don't worry about it; I shall outline a method of doing so using the PHPMyAdmin web interface, which you can setup on any web server which executes PHP scripts.


Playing with mysqldump

If you have either a shell or telnet access to your database server, you can backup the database using mysqldump. By default, the output of the command will dump the contents of the database in SQL statements to your console. This output can then be piped or redirected to any location you want. If you plan to backup your database, you can pipe the output to a sql file, which will contain the SQL statements to recreate and populate the database tables when you wish to restore your database. There are more adventurous ways to use the output of mysqldump.

A Simple Database Backup:

You can use mysqldump to create a simple backup of your database using the following syntax.

mysqldump -u [username] -p [password] [databasename]> [backupfile.sql]

[username] - this is your database username
[password] - this is the password for your database
[databasename] - the name of your database
[backupfile.sql] - the file to which the backup should be written.

The resultant dump file will contain all the SQL statements needed to create the table and populate the table in a new database server. To backup your database 'Customers' with the username 'sadmin' and password 'pass21' to a file custback.sql, you would issue the command:

mysqldump -u sadmin -p pass21 Customers> custback.sql

Continue reading Backing Up and Restoring Your MySQL Database

Configuring Apache to use a .htaccess file

Just a good step by step on how to configure Apache to use a .htaccess file. I rarely ever use this method except in testing so I always forget.

First, get your web administrator to enable your use of .htaccess files. This requires a stanza in ServerRoot/conf/access.conf like this:

AllowOverride AuthConfig

where /home/webber is replaced by your home directory. Without this, the usual default is AllowOverride None, which means that .htaccess files are ignored. The above stanza allows .htaccess control in all subdirectories of the specified Directory.

Set up a reasonably secure directory for the password (and optionally the group) files. This directory should not be in the web document tree! If it is, someone who can learn or guess the URL of the password file can fetch it and try to crack the passwords. (This refers to visitors from elsewhere on the Internet. There is no simple way to prevent users with accounts on the web server host itself from snooping in the password file, so we will have to settle for security by obscurity and trust them not to try too hard.)
Let us name this directory http-etc by analogy to the Unix /etc directory where the system passwd and group files reside. Place it in your home directory (not in public_html) so that it is outside URL space. Give it permission 701 = rwx-----x meaning you the owner can do anything, and the web server, running as the ordinary user apache, can access the directory but cannot list it (so it must know the file names in advance).1

Continue reading Configuring Apache to use a .htaccess file