Asking Github how it’s feeling

One recent project I worked on depended very heavily on Github. If you don't know what Github is it's a hosting service for projects that uses Git version control and if I really needed to explain that to you then the rest of this post probably won't do much for you.

The problem with depending on external services and API is that when they are having a bad day, then you are probably having a bad day. The project I was a part of was a Node application that would have to be built and rebuilt several times on several different machines, we are talking in the thousands. This application would reach out to Github for several modules which were essential to the build process. Needless to say there are ways to architect this solution to remove this dependency but that isn't the point of this post 😉

Github has a great status page which does a good job at keeping you informed on the current going on with the Github platform but the problem with it is you need to go to the page, get the status, and if there is an issue continually return to see if there are any updates. Thanks to developer Romin Irani (@iromin on twitter) you can now interact with Github over IM and more importantly have his GitHub Status Bot send you notifications whenever Github has any sort of disruption, planned or otherwise.

GitHub Status Bot is pretty simple and easy to use. Its worth noting that GitHub Status Bot is not an "official" Github Bot and is hosted Google AppEngine. Romin Irani also makes his source code available on Github

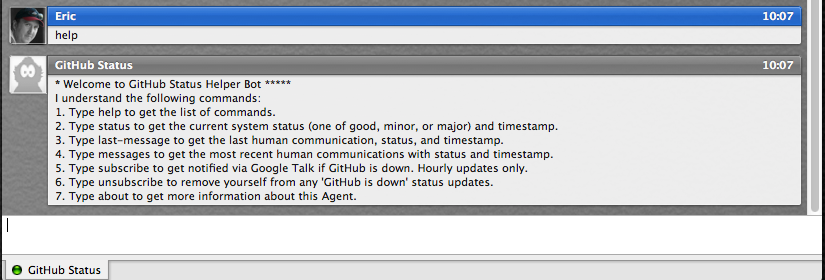
Using GitHub Status Bot is pretty straight forward

  • First, simply add [email protected] to your Gtalk buddy list
  • Once added send a message to the bot by typing 'help'. This will provide you a list of commands that the bot will respond to.

GitHub Status Bot - Help

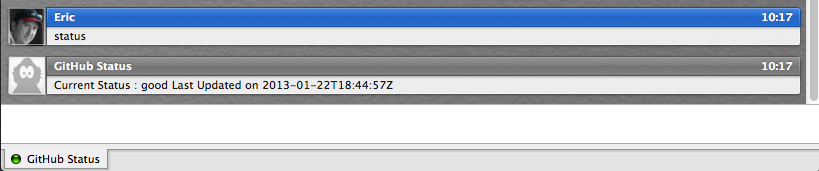
  • 'status' gives you the current system status

Screenshot_1_26_13_10_17_PM-2

  • 'last-message' gets the last human communication, status, and timestamp.

Screenshot_1_26_13_10_23_PM

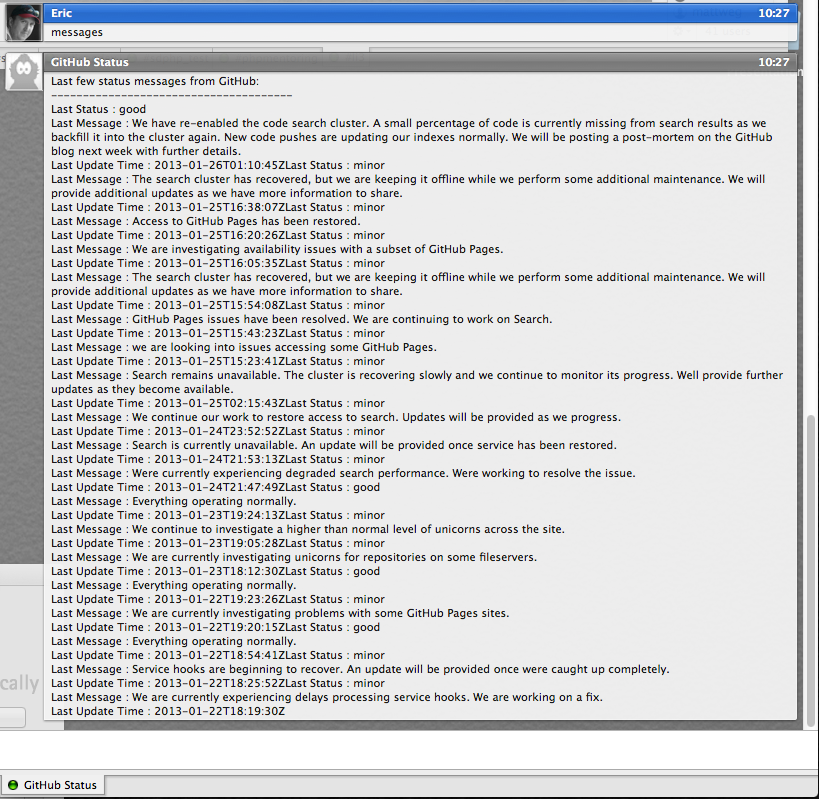
  • 'messages' will get you a list of the most recent communications with status and timestamp.

Screenshot_1_26_13_10_28_PM

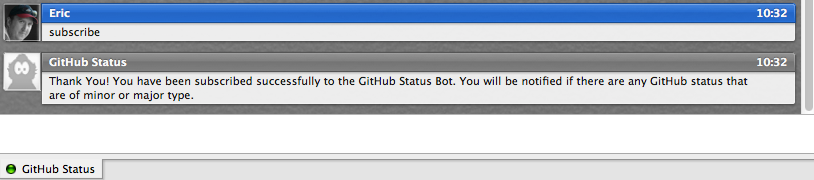
  • 'subscribe' is a key command, what this does is lets the bot know you want to be notified via Google Talk if GitHub is down.

Screenshot_1_26_13_10_34_PM

  • 'unsubscribe' will remove yourself from any 'GitHub is down' status updates. I've found, unless I was having issues or needed to keep a close eye on Github that the status message will tend to get a little chatty for day to day following.

Screenshot_1_26_13_10_38_PM

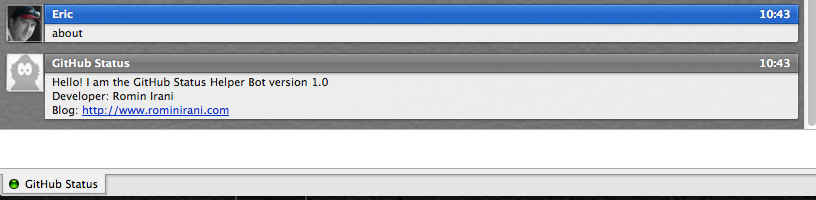
  • And finally if you just want to be reminded who you have to thank for this awesome service, and what version you are on, type in 'about'

Screenshot_1_26_13_10_43_PM

That's pretty much it, hope you find the GitHub Status Bot as helpful as I do.

BASH Prompt Pr0n

So I've been asked a couple of times for this post and I keep not getting around to it so thought I would take some time and get this out. My bash prompt is very informative, long, and functional and that is they way I like it. One prompt actually results in 2 lines in my terminal being used. This is my current Bash Prompt in terminal:

BashPrompt

  1. First thing to notice is my command prompt is actually on the second line, below all the information. This is by design.
  2. The first part of the prompt in the typical username and computer name. Nothing special. A lot of people remove this but I keep it. When all the voices in my head start shouting at each other I can always look at my command prompt and remember who I am.
  3. Next is my location on the computer. Again, a lot of people will just have this piece represent only the current folder but I like to see the entire path. Main reason is I might have several Project folders on my system and this helps me to see which Project folder I am in.
  4. Then comes this little piece of magic that I love, my Git Branch. This section only displays when I am in a directory structure related to a Git checkout and shows me which branch of that git checkout I am working on. This section, depending on your system, may require different set ups. Since I am on my OSX system what I am using is git-completion.bash (or git-prompt.sh). One of the better post on how to install this correctly can be found on a StackOverFlow.com thread. Keep in mind, if I am not on a Git branch none of this section displays, not even the []- which makes it is very clean.
  5. Finally I like to add a time stamp to the end of my prompt. This allows me to return to a console and figure out when I last ran something from that window. It's very helpful. The time doesn't stay current, meaning it won't continue to keep time, it will only show you the time when that prompt was created and that is it.

The prompt does include the different colors for the different sections if your system supports it and most Unix type console do support it. Here is the magic that makes this happen.

There are a couple of ways to play around with this, tweak it until you find what you like, without impacting your system permanently until you want to. At the command prompt simply copy and past the entire line including the word "export", you should be able to see the new prompt immediately. Once you've tweaked it to exactly what you want you can add it to either you .profile or .bash_profile files however you can remove the word export when you do that and just start the line at PS1

If you would like a version without the Git Branch indicator this version should work for you

Here is a link to some other helpful and fun Bash Prompts

Enjoy and Happy Bash'ing
Update: My buddy @johncongdon on twitter pointed out by adding export GIT_PS1_SHOWDIRTYSTATE=1 to your .profile or .bash_profile then you will also get the status of the Git branch.

Screenshot_2_7_13_2_55_PM-2

15 Minutes with CakePHP

I recently gave a quick, and I mean quick, presentation on CakePHP to our San Diego PHP User Group. The presentation consisted of 5 slides of which only 2 were actually about CakePHP. The rest of my presentation was me building a quick blog which I might add I successfully did in about 15 minutes.

SDPHP CakePHP Presentation 1 SDPHP CakePHP Presentation

So the presentation went something like this:

But it probably goes without saying that 2 slides and a quick 15 minute demo really doesn't do a framework like CakePHP justice. CakePHP is an awesome framework with a ton features and of course you can always read the documentation yourself. However, there did seem to be a lot of interest in the command line interface I was using to build my demo code with.

I showed a lot of the functionality of the 'Console/cake bake' command. To recap a little.

> Console/cake bake
---------------------------------------------------------------
App : app
Path: /path-to/project/app
---------------------------------------------------------------
Interactive Bake Shell
---------------------------------------------------------------
[D]atabase Configuration
[M]odel
[V]iew
[C]ontroller
[P]roject
[F]ixture
[T]est case
[Q]uit
What would you like to Bake? (D/M/V/C/P/F/T/Q)
>

I also demonstrated you can run

> Console/cake bake all

and we saw all sorts of auto code generation magic happen.

But there are also other options I didn't touch one.

> Console/cake bake db_config
> Console/cake bake model
> Console/cake bake view
> Console/cake bake controller
> Console/cake bake project
> Console/cake bake fixture
> Console/cake bake test
> Console/cake bake plugin plugin_name

One of my complaints was that CakePHP didn't have built-in migrations. Cake does have a couple commands to make moving database around a little easier.

Now we take a look at Console/cake schema.

We start with

> Console/cake schema generate

This will generate a schema.php of the data in your projects database.

To then use this data on another project or database you run

> Console/cake create create

which uses that schema.php to import the schema.

You can also use the schema command to create a database dump file

> Console/cake schema dump --write filename.sql

Cake Shell also comes with a ACL Shell interface for managing and inspecting Acl databases. We spoke a lot about the need to run PHPUnit test and touched on how cake bake had the option to generate test files. As such the command line interface also includes

> Console/cake test

One of the more interesting commands, and one I have not tried using myself is the Upgrade command.

> Console/cake upgrade all

According to the Cake documentation "The upgrade shell will do most of the work to upgrade your CakePHP application from 1.3 to 2.0." which, if worked as advertised, would make updating projects to the latest version of the framework a lot easier.

The full list of shells available look like this

Available Shells:

[CORE] acl, api, bake, command_list, console, i18n, schema, test, testsuite, upgrade

Hope this perks the interest of some of you to give CakePHP a try.

Why aren’t you using git flow?

Attended another great presentation put on by the San Diego PHP User Group (which I am now a co-organizer of) around a workflow built off Git called Gitflow, presented by John Congdon (@johncongdon). Unfortunately the slides, as good as they are, don't capture all the great discussion and examples that were sparked up from the presentation but its a good start.

As I mentioned, I've taken a more active role is the SDPHP Group so if you have any question feel free to ping me. You can also keep tabs on the groups in the normal spots:
Twitter: @sdphp
Facebook: San Diego PHP
Meetup: SanDiegoPHP

Getting some functionality back in the system tray on Ubuntu 11.04

Ubuntu 11.04 introduced a new, cleaner user interface called Unity. I'm not a huge desktop GUI guy, doing a large majority of my work in the command line, but I do like to try and stay current on the latest greatest interfaces.

I'm not overwhelmed with Unity. It's OK but not really earth shattering. You have the option to switch back to the "classic" Gnome interface if you wanted to but I haven't done that.

One huge annoyance I've noticed about the new Unity interface was a lack of a true "system tray". Many application in Ubuntu (or Linux in general) leverage a similar approach Windows machine do and allow applications to run in a System Tray, cleaning up any task bars you might have. In Unity, there were a couple applications that were visible, like Dropbox, the clock and Volume but several others were not such as Skype and Truecrypt.

This became a big problem for Truecrypt because once I closed the Truecrypt interface I couldn't figure out how to get back to it. If I tried to launch the application again the system would report that it the application was already running, which it was. In the past I would get back to the interface through the icon in the system tray but this icon would not display in Unity, at least not until I found a posting on Facebook http://www.facebook.com/topic.php?uid=6723083591&topic=17003

This simple command in a terminal window corrected my problem and life is good again

  1. gsettings set com.canonical.Unity.Panel systray-whitelist "['all']"

As you can see I got all my system tray icons back and I am now a little happier with Unity.


Screenshot-1


Posted via email from shocm

My Non-Open Source (Proprietary) Guilty Pleasures

Being an "Open Source" guy there is a certain stigma that goes along with that title, one being that everything you use has to be Open Source. Where I take great pride in the knowledge there isn't really any aspect of my digital life I couldn't do without an Open Source solution, I personally don't necessarily make Open Source a "requirement". I always look for the best solution and tool for a particular task, for me freedom and access to the code weighs heavily in that decision but is not the only parameters in picking a solution.

In the interest of full discloser, and because there are people who enjoy pointing out when they "catch me" not using Open Source (as if I don't know), I present to you a list of my Non-Open Source guilty pleasures that I use frequently (with some justification for using them)

Note: with the exceptions of OSX and the Microsoft products all solutions below do offer free versions of their products though I typically pay for the upgraded products.

Desktop

  • Evernote (http://www.evernote.com) - There are several alternatives to Evernote, including Open Sources ones such as Tomboy but they all seem to lack either features or cross platform compatibility. Evernote does have a OSX and Windows client but no client for Linux which has always been a huge draw back. Evernote does have a pretty good web interface, which continues to improve and this helps a lot when I am on my Linux desktops. Evernote also have a lot of open APIs and there has been some activity to writing alternative Evernote clients that will run on Linux desktops including one I've checked out called Nevernote (http://nevernote.sourceforge.net/)
  • Navicat (http://www.navicat.com/) - I simple like this tool. The user interface and feature set is wonderful. There are tons of Open Source GUI clients to connect to MySQL database and even though 99% on my database activity is connecting to a MySQL backend every now and then I need to connect to MSSQL, Oracle, or PostgreSQL and my Navicat Premium allows me to do this in one client. It also has a wonderful feature of establishing my MySQL connections over SSH which I love when I need to work on my Windows boxes. It's baked in so I don't have to establish my own separate SSH tunnel. They also have clients for Windows, OSX, and Linux
  • Dropbox (http://db.tt/AyOLUYV) – I have to be honest, I’ve used Dropbox for several years but it is always on my hit list to move to an alternative Open Source solution. There seems to be a new one that drops every month. When I get comfortable with the staying power and feature set that Dropbox offer, I will probably drop Dropbox.
  • OSX (http://www.apple.com/macosx/) - This is really a decision of convince than anything else. There are typically a greater number “vendor support” desktop application that are not support on Linux desktops such as the previously mentioned Evernote. However OSX is BSD at heart and lets me retain a lot of the Open Source tools I am accustomed to on my Linux desktop including a very power command line and scripting ability. My OSX desktop also affords me the unique benefit of running virtualization software such as Virtualbox (http://www.virtualbox.org/) and allow me to run Windows, several Linux distributions, and OSX all on one physical machine. This is really nice especially when needing to do testing.

Continue reading My Non-Open Source (Proprietary) Guilty Pleasures

SSH AutoComplete on OSX

I am a very heavy user of SSH, like everyday all day type of user. I know a couple cool SSH tricks like port forwarding and mapping remote drives. One thing that always bugged me was the lack of auto complete when I was on my OSX machine. You see with SSH, you can define a bunch of individual host and configurations unique to those host in a file called .ssh/config. It's a great tool to have and when you do have some host define, on a Linux machine, you can type in the command ssh, then the first couple if letters of the host and hit tab. It will act as any tab completion does for commands and fill in as much of the hostname as it can before it requires some other unique identifier. However, this cool autocomplete feature didn't happen naturally of my OSX box.

Through the years, I've had an idea of what I needed to do to create my own script to handle it. There is the complete command, the trick is grepping the config file and pulling out the right information. I decided to be lazy and just manually created several alias for my ssh server. The alias approach worked, but this grew into a very long list of alias and wasn't very efficient. So tonight I decided I was going to write the script to meet my needs and about 2 clicks on Google links later, I found someone who had actually already completely done it. Nem W. Schlecht posted his script on a Macworld hints forum a couple years ago. Here is a link to that original thread http://goo.gl/Wd4Z5 but the piece of magic that did the trick is below. As a added bonus, it also creates auto complete from servers it finds in your known_host file. I will repost his post, not just the code, because he has some wise advice on where to place the code

The macports suggestion is a good one, but IMO, includes too much. If you don't have macports installed, you can add the following to your .bash_profile (I wouldn't add it to my .bashrc, since that gets read in by cron jobs and remote commands).

There are a couple improvements here. First, this will also read in aliases in your ~/.ssh/config file. Secondly, it will ignore commented out entries in your ~/.ssh/known_hosts file. Finally, this is a function and not a static list. Thus, it is immediately aware of any new additions to either file (although on really slow machines it will be slower than a static list).

_complete_ssh_hosts ()
{
        COMPREPLY=()
        cur="${COMP_WORDS[COMP_CWORD]}"
        comp_ssh_hosts=`cat ~/.ssh/known_hosts | \
                        cut -f 1 -d ' ' | \
                        sed -e s/,.*//g | \
                        grep -v ^# | \
                        uniq | \
                        grep -v "\[" ;
                cat ~/.ssh/config | \
                        grep "^Host " | \
                        awk '{print $2}'
                `
        COMPREPLY=( $(compgen -W "${comp_ssh_hosts}" -- $cur))
        return 0
}
complete -F _complete_ssh_hosts ssh

Don't forget you need to "source" you file to get the new command to load in your terminal or you can close your terminal window and open a new one.

Posted via email from shocm

Nasty Bug – Ubuntu 10.04 on VMWare Fusion OSX

Came across a nasty little bug when I installed the latest Ubuntu 10.04 (LTS) into a virtual machine using VMWare Fusion 3.02 on my OSX box. This was a fresh install and the install itself went smooth, the problem occured when the initial login screen appeared. Although my mouse worked just fine and I was able to click on the user to log in, I wasn't able to type anything. My keyboard was completely unusable within the virtual machine. I was not able to type any input via the keyboard.

After doing some Googling I discovered that once you got past the login screen the keyboard would work fine. The only way to login was to initiate the on-screen keyboard and type in your password. You can bring up the on-screen keyboard by clicking on the Universal Access icon on the lower right hand side of the screen and choosing "Use on-screen keyboard". One side note here, when I first checked the box to use the on-screen keyboard, the keyboard would flash and disappear. What I needed to do was keep the box check and reboot the machine, when the login screen returned, the keyboard was there.

Once I logged in the physical keyboard worked fine. I was able to use it in all the applications and didn't notice any problems, but once I logged out and returned to the login screen, again no input from the physical keyboard. Now I needed to fix this.

What didn't work 🙁

At this point I go into basic trouble resolution mode and decided to start by reinstalling and upgrading the VMWare tools. Not going to get into a step by step here how to do that but the short of it is after reinstalling the VMWare tools and rebooting I was stuck in the same situation and needed to use the on-screen keyboard to log in. Next obvious step, apply all patches to the Ubuntu desktop, did this, rebooted, still no go.

What did work 🙂

Clearly, you are not reading this article to learn how not to fix it. Trust me after doing enough searches there are plenty discussion threads out there with "This doesn't work for me either, anyone fix this yet?" to keep you reading for hours. I found a couple good links that I will post at the end of this article that got things resolved. The short answer is I logged into the machine, fired up and console window, type in the command
[bash]
sudo dpkg-reconfigure console-setup
[/bash]
For keyboard I selected "Apple" and then just selected the defaults for everything else. Once I exited the configuration wizard, I restarted the machine and all was right with the Ubuntu world again. Did a couple reboots to make sure and everything seems to be working fine now.

One more side note

This issue  occurred on a clean install of the current Ubuntu 10.04 LTS release. I had been previously running the beta version of the 10.04 release which worked fine and never had a problem with the keyboard input. However, after patching that box today, same issue occurred.

The Links

Two links basically lead me to my resolution

[Nagios] Error: Could not stat() command file ‘/var/lib/nagios3/rw/nagios.cmd’!

System: Ubuntu 9.10 | Nagios 3.x

This is another post that is more of a note to myself than anything else. Been doing a lot of Nagios configuring and decided to implement the ability to push commands from the web interface. I followed the basic instructions to configure "External Commands" but after doing and going to the web interface to test it, I got the following error message;

Error: Could not stat() command file '/var/lib/nagios3/rw/nagios.cmd'!

The external command file may be missing, Nagios may not be running, and/or Nagios may not be checking external commands. An error occurred while attempting to commit your command for processing.

The file was there so I did what any good geek should do, I did a quick google search. The closet thing I could find was some commands to fix the issue on Debian systems. Since I was running Ubuntu, which is for all intensive purposes Debian, I figured I would try it.  So I ran the following set of command;

sudo /etc/init.d/nagios3 stop
sudo dpkg-statoverride --update --add nagios www-data 2710 /var/lib/nagios3/rw
sudo dpkg-statoverride --update --add nagios nagios 751 /var/lib/nagios3
sudo /etc/init.d/nagios3 start

This worked like a charm and the web interface began accepting commands.

Sony Electronics Creates Open Source Development Community

Last week Sony open the doors to a new web site, as well as a new approach for the organization, called Sony Developer . Sony Developer is meant to become a hub for Open Source development efforts for Sony Electronic products.

Currently, Sony has enabled the community for "SNAP" which is an application framework for consumer electronic devices. From the SNAP site;

"SNAP stands for Sony's Networked Application Platform and is part of an emerging new ecosystem for making downloadable applications available to networked devices like TV’s, Blu-ray Disk players and other Consumer Electronic products. SNAP is in the very early stages of development and has a lot of room to grow"

This will open an avenue that will allow developers to get their applications onto SNAP enabled devices such as televisions. SNAP is based on the GNUstep community, whose origin dates back to the OpenStep standard developed by NeXT Computer Inc (now Apple Computer Inc.) which also implements the extensions added by Apple in the form of Cocoa. The main language on GNUstep for SNAP is ObjectiveC and the SNAP development web site points a lot of great resources on ObjectC from beginners guide to optimization.

Sony offers a guides and a SDK for download to start with your development efforts. It's mentioned on the SNAP web site that some good examples of applications would be "Games, Widgets (weather, news, traffic, etc), remote controls, social apps, media sharing apps, media players, home automation". Also according to the web site Sony will be hosting contest in the future for SNAP developers with prizes ranging from Sony televisions to Sony Walkman.

Another section of the Sony Developer Web site will be the dash section, which is currently unavailable but from what I've heard should be opened in the coming weeks. dash is the Sony new Personal Internet Viewer. Developed with Flex, Sony is hoping to encourage and foster application developed on the dash product.

‘report_activate_error’: RubyGem version error

So from time to time I will post small things to my blog that I just want to keep track of or remember how I did something. This is one of those post. I should prefix this post to anyone who happens to come across it and read it, I am by no means a "Rails Developer" and as a matter of fact, I ran into this problem working through a "How to" books.

The issue

I am running OSX 10.6.2 and although I had Ruby on Rails working on it at one time, some how, some where it broke. Now there is nothing more frustrating to a n00b who is trying to work through a tutorial on how to learn a new programming language and not being able to get past the first chapter because something about the base install of the programming language that you don't know anything about and you're trying to learn, wont work.

The Actual Error

When I try to create my first controller this is what happens

  1. ruby script/generate controller main welcome

And this is what the system kicked out to me
  1. /Library/Ruby/Gems/1.8/gems/rails-2.3.5/lib/initializer.rb:271:in `require_frameworks': RubyGem version error: rack(1.0.0 not ~> 1.0.1) (RuntimeError)</p>
  2. <p>from /Library/Ruby/Gems/1.8/gems/rails-2.3.5/lib/initializer.rb:134:in `process'<br />
  3. from /Library/Ruby/Gems/1.8/gems/rails-2.3.5/lib/initializer.rb:113:in `send'<br />
  4. from /Library/Ruby/Gems/1.8/gems/rails-2.3.5/lib/initializer.rb:113:in `run'<br />
  5. from /Users/eric/Dropbox/Code/Rails/r4music1/config/environment.rb:9<br />
  6. from /Library/Ruby/Site/1.8/rubygems/custom_require.rb:31:in `gem_original_require'<br />
  7. from /Library/Ruby/Site/1.8/rubygems/custom_require.rb:31:in `require'<br />
  8. from /Library/Ruby/Gems/1.8/gems/rails-2.3.5/lib/commands/generate.rb:1<br />
  9. from /Library/Ruby/Site/1.8/rubygems/custom_require.rb:31:in `gem_original_require'<br />
  10. from /Library/Ruby/Site/1.8/rubygems/custom_require.rb:31:in `require'<br />
  11. from script/generate:3

Sidebar
Naturally, the first thing I do is start hitting Google and start clicking on links. A lot of similar issues with a wide variety of solutions. From just doing a simple 'sudo gem update', to making sure rake is installed, to making sure you have the correct rake version installed. None of which worked for me. Finally, I stumbled onto Wojno' Site and following the steps in his post I manage to resolve my problem.

The Fix
If you didn't want to click on Wonjno's link here are the steps that fixed my problem. Had to change a couple of things because my install paths were a little different since I was running a different OS.
We begin by uninstalling the problem package

  1. sudo gem uninstall rack

When prompted, make sure you remove all versions of the rack packages. Now this is one place where my experience differed a little. I ended up getting prompted to uninstall rails itself. I'm a brave soul, that didn't scare me, so yeah I uninstalled it.
Here is what that looked like
  1. <br />
  2. sudo gem uninstall rack<br />
  3. Remove executables: rackup in addition to the gem? [Yn] &nbsp;Y<br />
  4. Removing rackup<br />
  5. You have requested to uninstall the gem: rack-1.0.0<br />
  6. actionpack-2.3.3 depends on [rack (~> 1.0.0)]<br />
  7. actionpack-2.3.5 depends on [rack (~> 1.0.0)]<br />
  8. If you remove this gems, one or more dependencies will not be met.<br />
  9. Continue with Uninstall? [Yn] &nbsp;Y<br />
  10.  

OK, that was a little scary but we will fix it.
I did manually remove the directory for the older version of rack
  1. <br />
  2. sudo rm -rf /Library/Ruby/Gems/1.8/gems/rack-1.0.1/<br />
  3. </bash><br />
  4. Now we reinstall things. Don't forget we need to reinstall the rails itself<br />
  5. <code lang="rails"><br />
  6. sudo gem install -v=2.3.5 rails<br />
  7. sudo gem install rack<br />
  8.  

After that, life was good, at least for me. If you found this article and actually read it in hopes that it helped fix your issue, well then I hope you had some success as well.

Posted via web from shocm

Great Mac tar archive tip

Every now and then I just post things I don't want to forget or worried that the original website might disappear. This is one of the cases. This is a blog posting I came across on a little problem that plaques those of us that enjoy using OS X but have a need to move files to other systems like Linux and Windows.

There is a dirty little secret the Mac hides from you when you are using it but becomes a glaring eyesore when you move to another OS. Some file clean up needs to happen because OSX creates these hidden files that start with a ._ which contains some extended information about the file that no other system reads so they aren't terrible useful when moving files to these systems. This post from a person working for Splunk, outlines how to tar up files on a OSX machine that is targeted for other systems and exclude the ._ files from the tarring process. Original article can be found here

--------------- POST ----------------------

When building Splunk applications, I’m often working on a Mac. There
are files that begin with ._ that are resource files, which contain
extended attribute information about the files for the OS. This is
great and all but I don’t want to include these files when I package up
an application and upload it to SplunkBase.

If you don’t have deep OSX knowledge, then keeping these files out
of your tarball is harder than it looks. One of our OSX gurus pointed
me toward the answer, and I was so excited (yes, I am a geek) that I
just had to share.

To build a tarball in Leopard that doesn’t contain the ._ files, use:

COPYFILE_DISABLE=true tar cvzf filename.tar.gz dirtotar

In Tiger, use:

COPY_EXTENDED_ATTRIBUTES_DISABLE=true tar czvf filename.tar.gz dirtotar

This is definitely going in my .bashrc so I don’t have to fuss with it again:

export COPYFILE_DISABLE=true

--------------- PEND OF POST ----------------------